Showing posts with label projects. Show all posts

Friday, September 23, 2011

Mad Hatter Meets Pee Wee Herman ;)

AKA My latest furniture re-do
Formerly an old blue dresser that wasn't
primed (so the
wood showed thru). Initially bought it back in Boston for $40. Transformed with extra fabric (I have too much fabric that I never know what to do with because I don't sew very well :P).
The letters were purchased for $0.98 at Hobby Lobby. Pretty inexpensive to re-do. Cheaper than buying a new dresser.
If you see green along the top edges of two drawers, it's because I didn't make the fabric cuts long enough (and I didn't cut the fabric straight enough :P, so I used green lace to hide the evidence.
I also learned that pinking shears are the best thing to use if you don't want to use anti-fray glue (or you're too lazy to look for it, if you do have it) <---- I'm guilty ;). I have a good excuse for that: most of this project was rushed and done at around 6 AM or during naptime.

Monday, May 16, 2011

Dresser Before and After

We bought an affordable dresser on Craig's List a few years ago. We purchased it for its size; it's fairly tall and wide. It's also a nice piece of solid wood furniture. Only thing is, "nice" isn't exactly the word I'd use to describe the way this highboy used to look. It was pretty ugly, actually. But it was an antique, so I couldn't throw it out. I thought a few coats of paint could transform it.

Jose wanted to throw it out, though :P! I asked him if I could have some time to give it a make-over around Mother's Day weekend. He still thought it was ugly and that it couldn't be beautified, but he knew how much I wanted to give it a make-over, so he said yes to giving me the time (aka watching Mirabel). I also convinced him that we should do it before our big move, since it would be a pain for him to lug it up and down the stairs by himself without help from the movers.

I couldn't have done it without the help of Sarah from Lollies Abode (and also my husband, who sanded the monster down)! She is a furniture make-over master. All her projects always look so fun and beautiful! Thanks for the tips, Sarah, they sure helped! Now, here are those before and after shots I promised to share with you :).


Wednesday, April 7, 2010

Weekend Projects and Sunshine

When it comes to boutique items, I am guilty of wanting to purchase more than I should. I can easily spend hours browsing all of the colorful handmade items on Etsy. Whether it's a pair of button earrings or an adorable purse with fun fabric, it's all delicious eye candy to me. Sometimes, to save a few bucks (or many ;), I actually try to make these items. I usually don't have the "skillz" or materials, but I work with what I've got.

I just don't feel right splurging on little treats like this very often, especially with a kiddo on the way. And I really don't see myself spending $60 on a sweet looking handbag.

Oh! But Little Odd Forest has such cute handbags and totes, click here to see what I mean. Who can resist? (I can, honestly folks, but let's just say I can't. ;)

Problem? Yes. Solution...

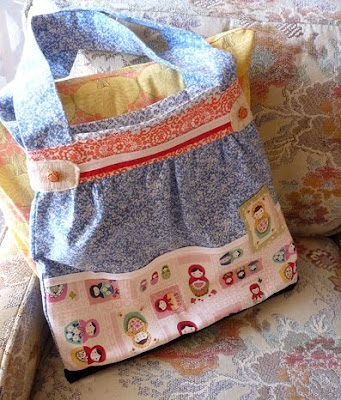
This past weekend I TRIED to make a similar handbag/diaper tote for Mirabel. I have so many random scraps of fabric. And sometimes I give in and buy a fat quarter or two of irresistible/adorable Japanese fabric, from Etsy, of course. I just so happened to have a little more than a fat quarter of pink nesting doll fabric, purchased earlier on in the pregnancy for Mirabel (you see, I was justified in making this "wise" investment ;). But the fabric was so cute, I was hesitant to cut into it... until I spotted the Odd Forest handbags!

Definitely not perfect. It's got its flaws and I'm still learnin'. But, by golly, I had a whole lotta fun making this bag. I will add that my seam ripper came to my rescue many times; it's my new best friend :).

Here are a few close-ups of the final product, including the nesting doll fabric. I added a few big pockets to the inside, too (can't have too many of those, especially with a baby!). The orange buttons came all the way from Bulgaria! They're from one of last summer's Etsy purchases :).

After finishing up the bag, Jose and I felt it was time for a sunshine break! Thankfully, we've got plenty of sun these days :). A nice change from the dreary weather. I think it's safe to say that spring has sprung.

I love pink trees. If only they tasted like cotton candy!
I almost forgot! We have a new neighborhood pal, meet Al. He's the albino squirrel that lives on our block :).


Sunday, August 23, 2009

Weekend Project

Want a work-out? Forget about using an electric sander and sand that piece of furniture down yourself! I did a lot of sanding this past weekend. I have to say it was pretty intense, considering how hot and humid it was. But I had so much fun!

I spend a lot of time in front of the computer for work, so the slight exhaustion I felt after completing these two little projects was actually nice! The first piece of furniture I made-over is at the bottom, it's the white bookshelf. I didn't get a chance to take a before photo and I almost forgot to take an after picture. The after picture was taken at the last minute, in my poorly lit kitchen, so I cropped-out the yellow-tinted background :P. The paint color I used is called white cotton. I put on 2 heavy coats of primer and 2 coats of paint. Other than the sanding, rolling on the primer took quite awhile. I think I primed it too much? Not sure.

The second piece of furniture that received a quick weekend make-over is the abandoned 2 drawer end table pictured directly below. I found it next to someone's trash can last year when I was taking a walk, so I picked it up and carried it home. It was too cute to throw away because it had potential. I was initially thinking about painting it white, until I saw what it looked like after a bit of sanding. It was even cuter than I thought it'd be and the wood smelled so nice! I didn't add a drop of paint or primer to the wood after sanding it down; instead, I focused on roughing up a few of the edges to give it a rustic look. I then replaced the ugly metal knobs/handles on each drawer with two vintage spools (I used two because each drawer has two ugly holes where the old knobs would be).

Before:

After:

Materials:

This primer is awesome!:
Bookshelf after (before it was a not-so-pretty light brown particle board color):

Tuesday, July 28, 2009

Up and coming summer/fall project!

We're heading back to Boston in just a few weeks... back to our little 100 year old cozy apartment! Jose and I have been thinking about what we can do to brighten up the place a little more when we get there. This time last year, we had no idea we'd spend so much time indoors (this was obviously before our first snowy winter!). We now realize it'd be a good idea to work on making our living room a little more bright and cheery (it's so dark when the sun sets around 4pm for 1/3-1/4 of the year!). By the way, that picture on the left, that's Boston... well, it's really the bridge we cross (on the T) to go from Cambridge to Boston.

Before we considered changing up the color scheme, we thought about just buying a new and bigger couch. Then we realized it'd be better to enhance the overall look of the apartment in a more affordable and fun way, by hand (we'll also buy a chair instead)! We'll make pillows, frame some of the colorful artwork I've collected, and paint some of our furniture. That last one is probably going to be the most challenging, since neither of us has painted anything before. But thanks to the internet (and the nice folks at Home Depot who gave us a few helpful tips), it isn't going to be a nightmare but an adventure... we hope :)!

I'm so excited! Now we have to decide if we are going to strip one of the items of furniture we have (a plain solid wood desk in our bedroom) or just sand it down before painting and priming it. Hmmm... I'm still a bit worried about using paint stripper, so we'll see how we move forward with that project. The other items are a little cheaper/smooth and made of mostly particlebored, so we'll only have to prime and paint those (says Home Depot).

Here are a few helpful furniture painting tutorials/sites that I've come across so far (feel free to share any tips if you have them! :).

By the way, I just emailed the blogger (Cindy) and asked her a few questions. She was nice enough to respond very quickly! I asked her about stripping (paint! :P silly!). She says she's read of people successfully painting furniture without stripping or even sanding, priming is the most important thing! She says the paint will chip if you don't prime first... good to know. Also nice to know I don't have to strip the desk, I think I'll just spend a day sanding it down.

(They chose to just sand and it looks pretty good to me :)


Artsparx.com is another great place to check-out...
Info on sandpaper

Tips from the folks at Home Depot:
For particleboard you can just prime and paint; be sure to use an oil based primer for particleboard, though. Water based can cause it to swell and bubble. Oil based by Behr/semi-gloss is a good one. If a hard veneer surface is involved, you can go ahead and use water based paints. But make sure the primer is also oil-based if you ware using oil-based paints. There are primers that say they don't require a sanded surface before applying, but it's a good idea to sand it a little bit anyway, to rough it up so the primer adheres.


Template by Suck my Lolly